This Tutorial goes from PDF or CAD to finished parts
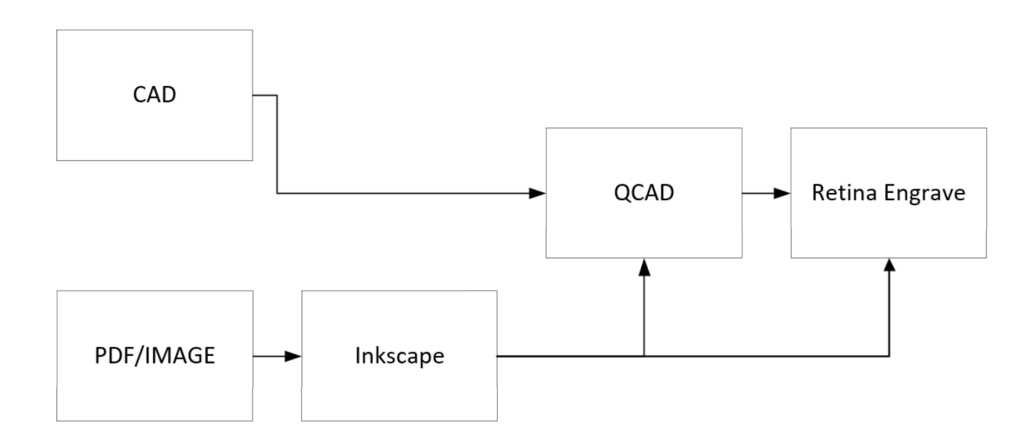
This tutorial was specifically written for the Rose-Hulman Design-Build-Fly team, but many of the processes are usable elsewhere. The laser in question is a Full Spectrum Hobby 5S 20×12 Laser. The flowchart is shown below.
QCAD – initial setup
In order to properly edit .dxf files, you’ll need a 2D drawing manipulation program. I recommend QCAD because it’s easy, free, and good enough for most editing purposes. 🙂
Begin by installing QCAD on your computer from the QCAD website. You’ll most likely want the QCAD/CAM trial for Windows 64bit.
https://www.qcad.org/en/qcad-downloads-trial
Follow all the instructions and open up the program. Next, you’ll need to delete the “pro version” files, or else you’ll get a timeout and annoying popups all the time. For this click “Remove” in the Trial widget window on the lower right and it should show you all the plugin files to delete. Mine were in C:\Program Files (x86)\QCADCAM\plugins. I ended up with only the qcaddarkstyle.dll, qcaddxf.dll, and qcadscripts.dll files left in that folder.
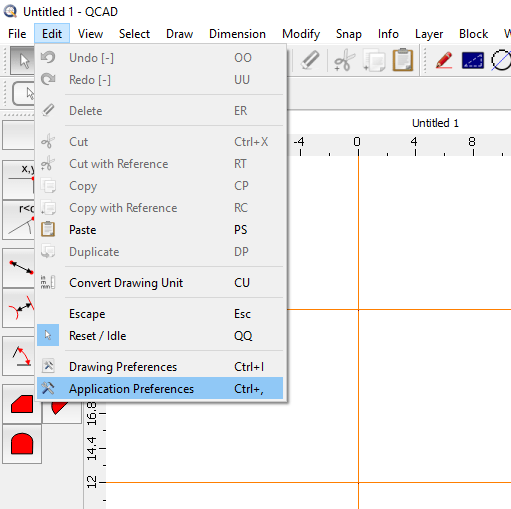
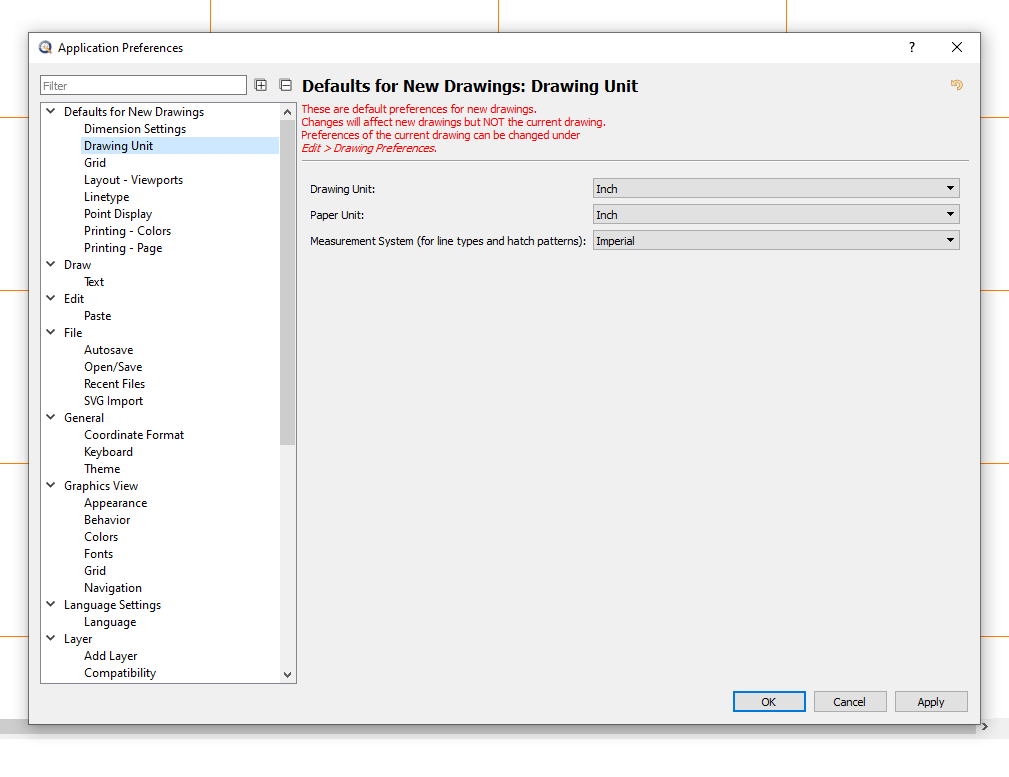
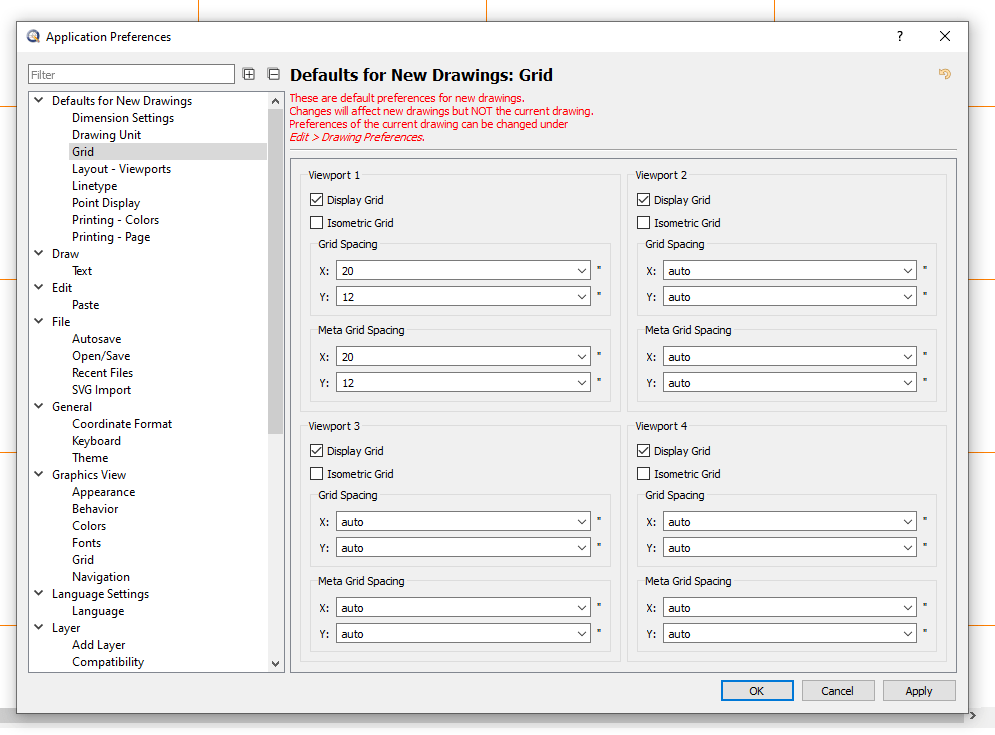
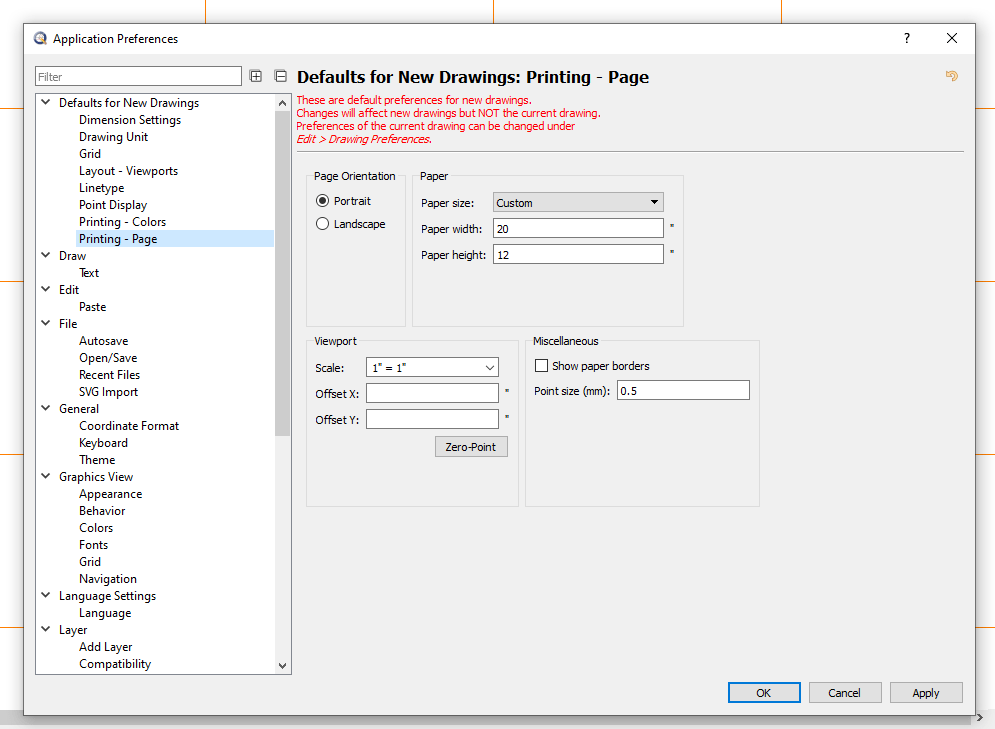
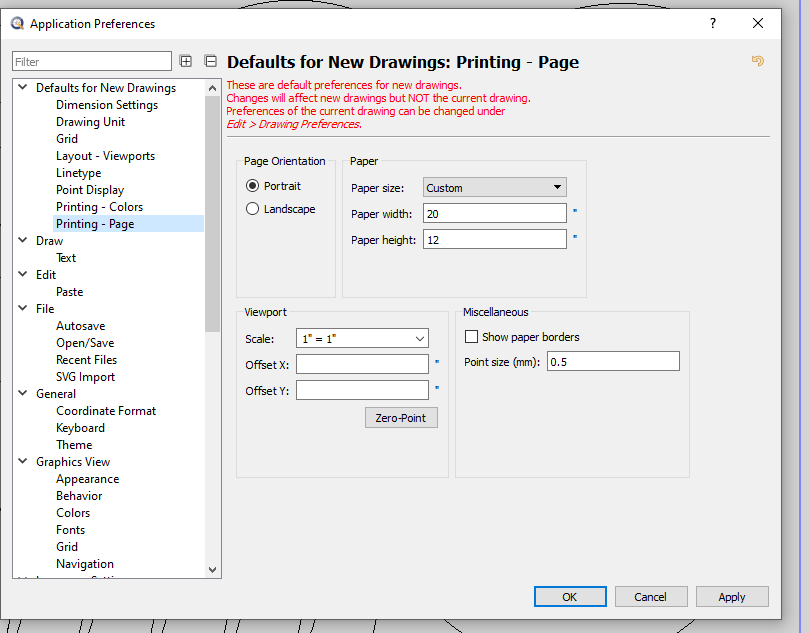
Now we can set up the application preferences. You can copy the settings from the slideshow below and that will work for most documents.
NOTE: if your drawing has settings built-in, you can change the “drawing preferences” to the same ones that are listed below and it should work out.
Retina Engrave – initial setup
Now that you can edit .dxf files, we’ll be able to make something with them. In order to control this specific laser, we need a program called “Retina Engrave”
Install Retina Engrave 3D (the old version) from this link, under the “5S” laser section
fsl3d.zendesk.com/hc/en-us/categories/360000059663-Hobby-Lasers
Run the installer and follow all the default settings.
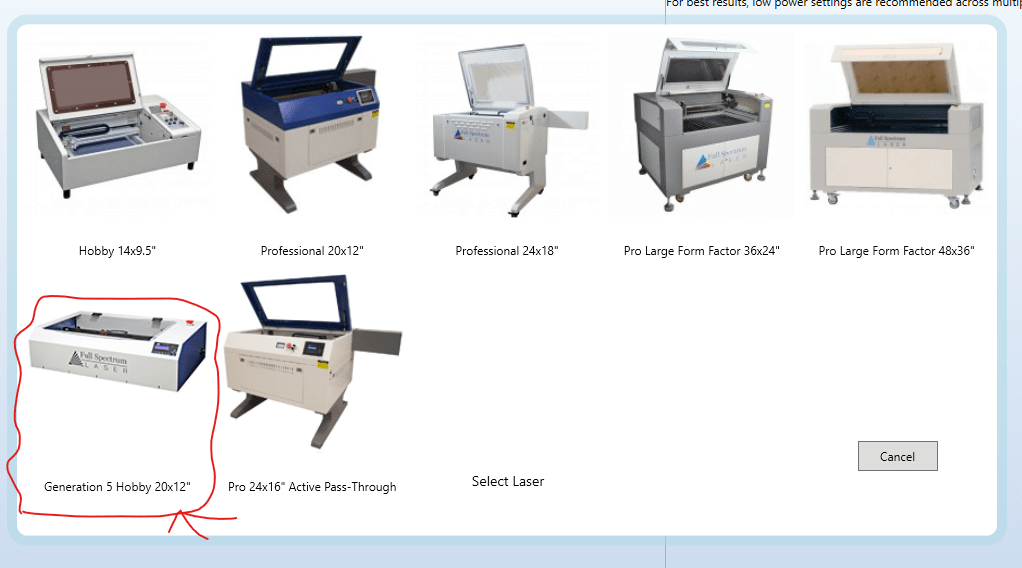
The laser this tutorial covers is the 5th Generation Hobby 20×12. I’m not convinced it’s the 5th generation, but it isn’t a professional one and it does have a bed about 20″x12″. Close enough. It works.
There shouldn’t be anything fancy for Retina Engrave setup, let me know if there is something I missed.
SOLIDWORKS – .dxf file export from a part
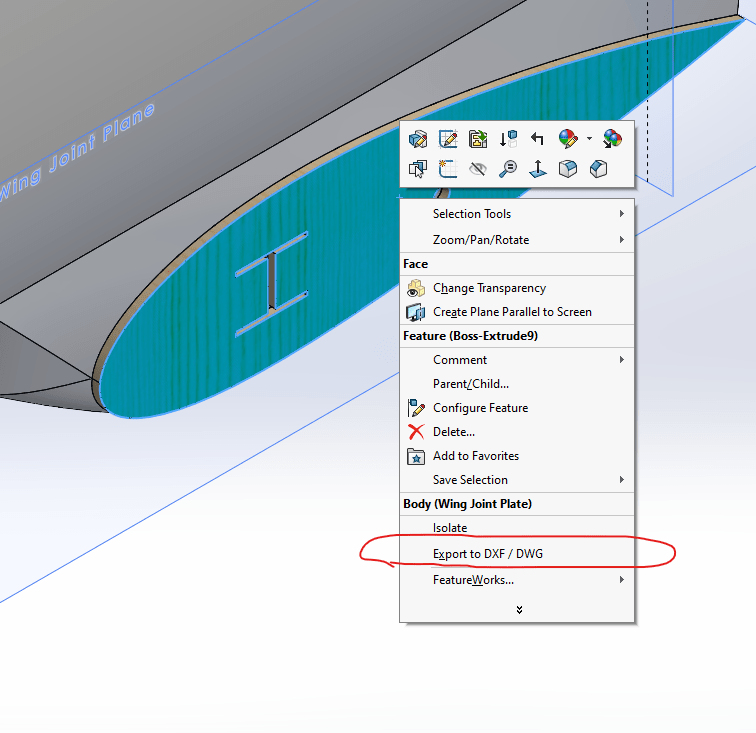
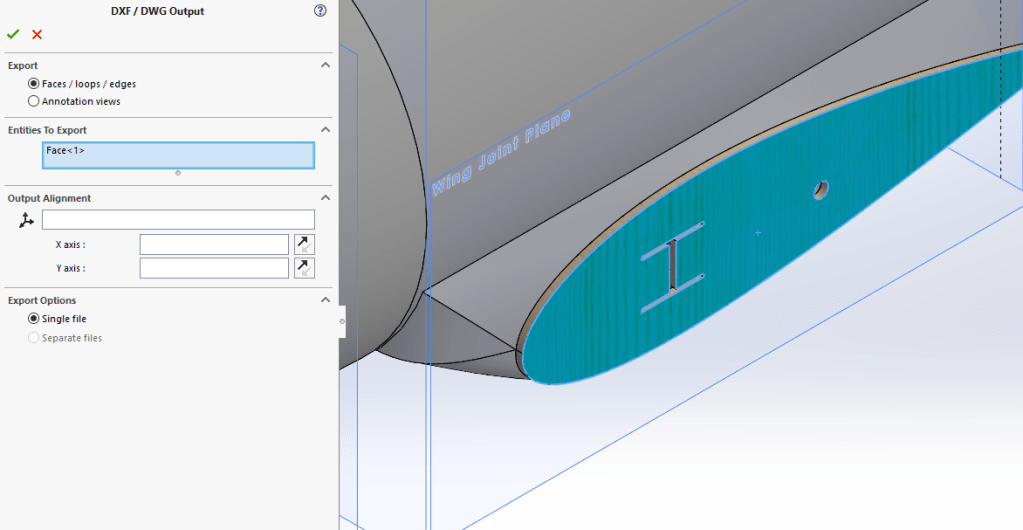
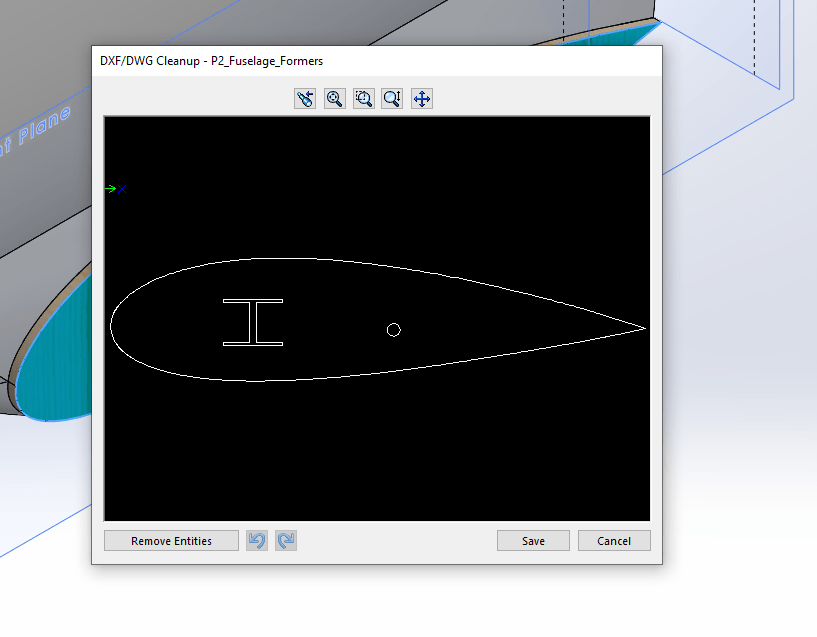
The first step is to get the two-dimensional .dxf file out of SOLIDWORKS. Find the face you want to export in your part file (I don’t think this works from an assembly) and right-click on the face. Select export to .dxf/.dwg and choose a location to save your file to. You can change your selection in the next menu, and in the one after remove some of the drawing entities if necessary. You can also do that in QCAD, so I recommend leaving it for now.
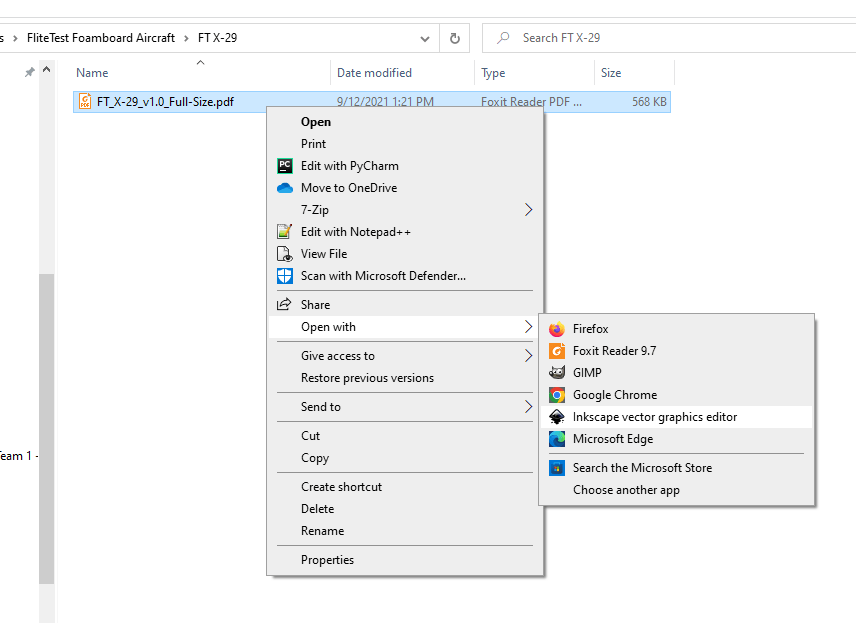
Inkscape – converting .dxf files from a .pdf or image file
If you have a .pdf file you want to make a drawing out of, we can use Inkscape to convert the image into a format that is easier for the laser to cut. Side note: there is a big difference between raster and vector files. A raster is an image, and a vector is a set of points and lines. We want to convert a raster to a vector so that the laser doesn’t spend any time on the empty white spaces of an image.
To begin you’ll need to download Inkscape. Yeah, it’s another program. But hey, now you can make doodles n stuff too.
https://inkscape.org/release/inkscape-1.2.1/
There shouldn’t be any setup for this one. I think.
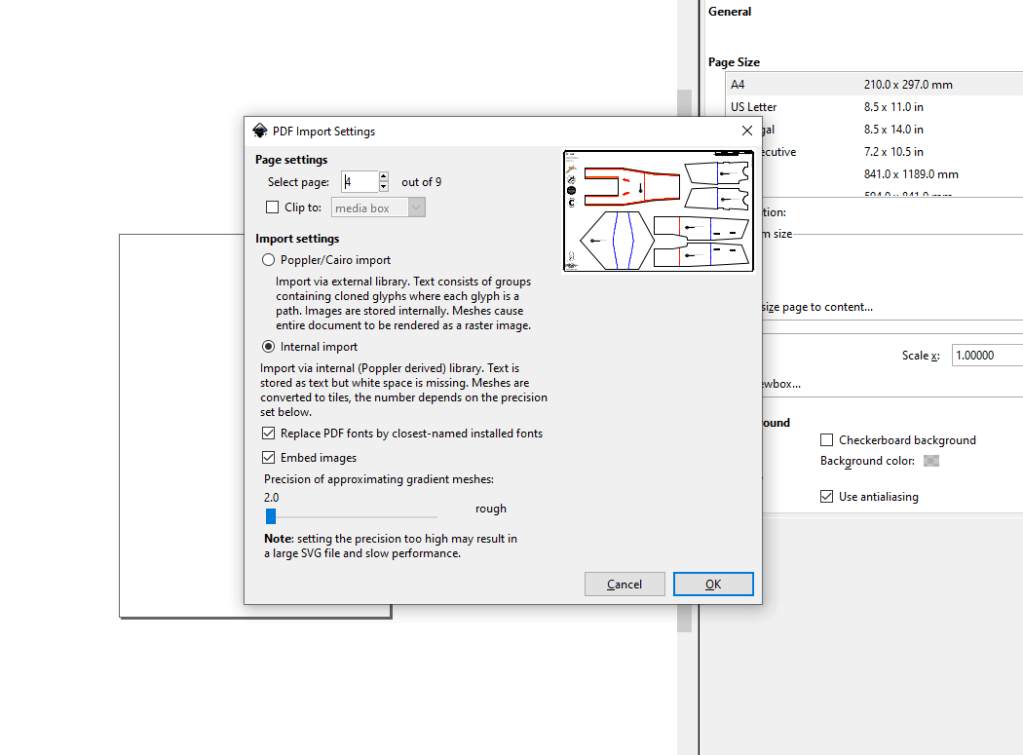
Open up the file in Inkscape, (you do have to select the page- only one page can be converted at a time), and then save it as a .dxf with settings shown in the slideshow below. That should be it. If the .pdf file has a weird size, you can change scaling and whatnot in Inkscape as well. This shouldn’t be strictly necessary, but if the drawing doesn’t fit on the Inkscape “canvas” then it might cause issues.
NOTE: if you use a second smaller monitor there is a weird glitch where the entire window will disappear into the abyss. Essentially the window gets stuck above the smaller display in the void between screens. Rearranging displays fixed it.
QCAD – file editing & printing
Ok. Now I have a good .dxf file. Now what?
Now, you edit it.
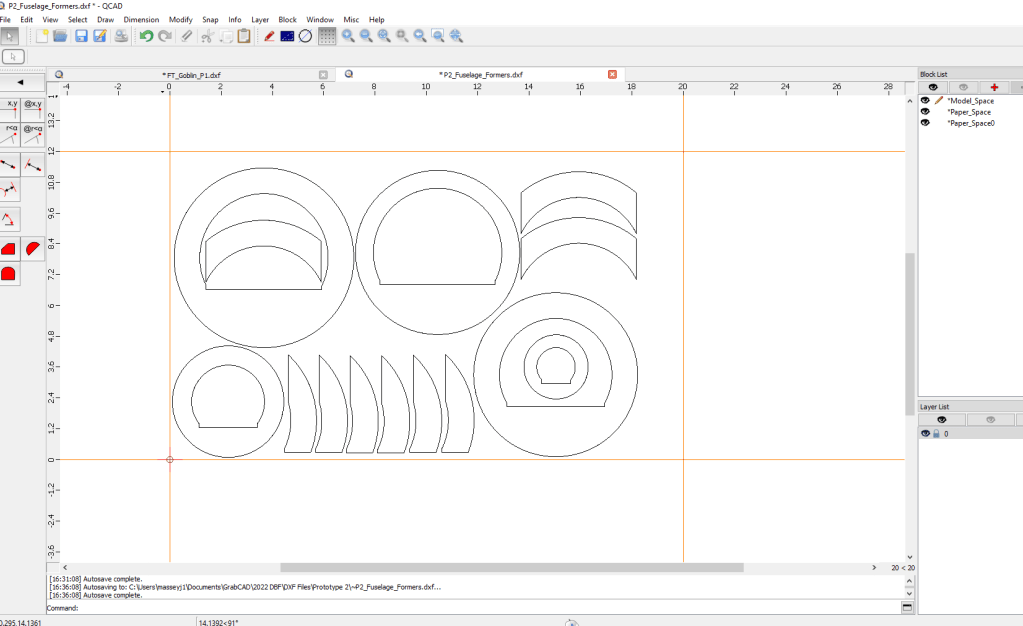
Open the .dxf file up in QCAD and look at it. Stare at it. Observe its beauty. Notice that it still says “SOLIDWORKS FOR EDUCATIONAL PURPOSES ONLY” at the bottom. Delete that. Actually, delete anything that you don’t want the laser to explicitly cut.
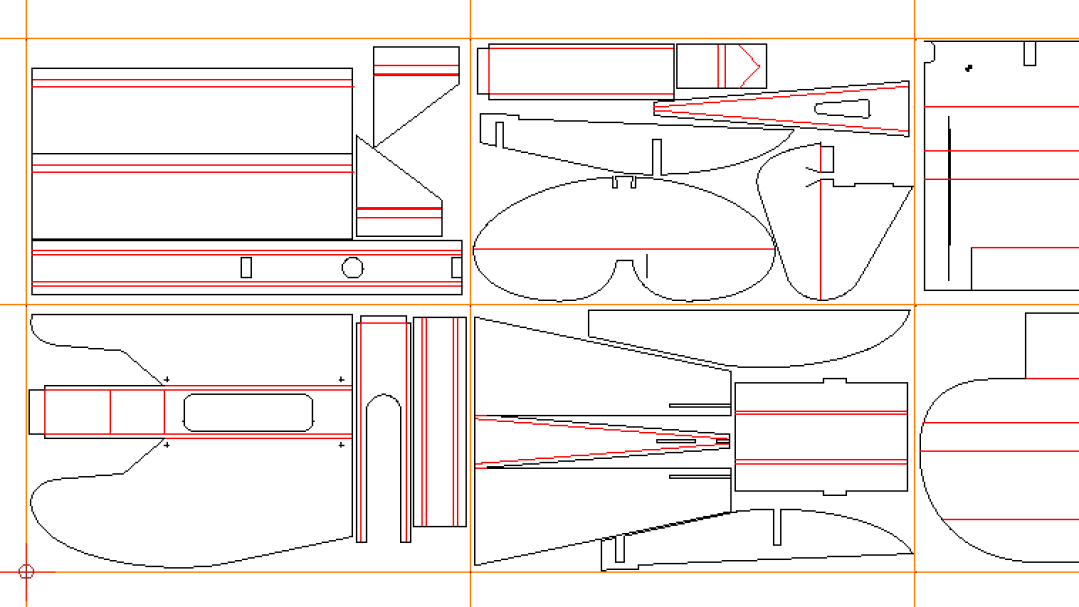
Rearrange the parts so they fit on a 20″x12″ grid. Hopefully, your QCAD displays this grid as a background so you can easily do this. If not, you may need to go update the specific drawing preferences.
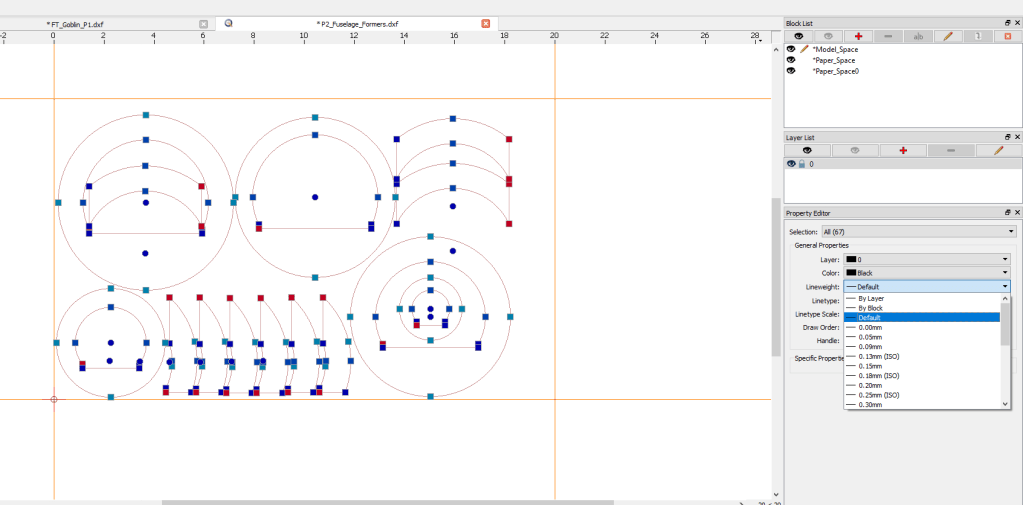
Now, select the entire drawing and change the lineweight to “default”. This will help prevent duplicate or missing lines.
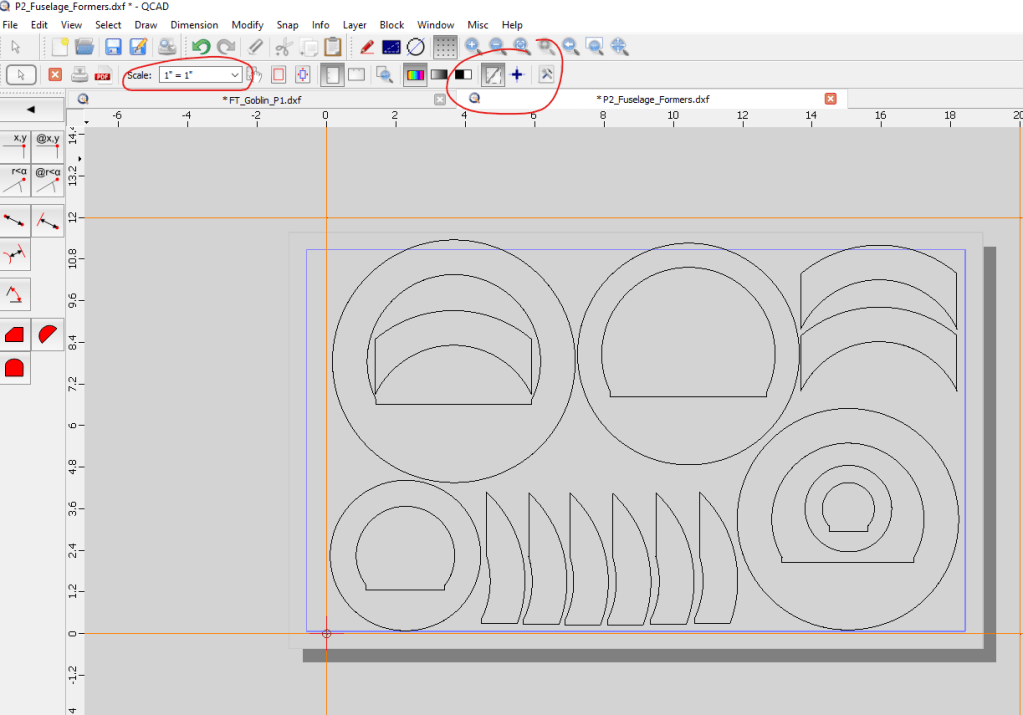
You can print straight from QCAD to Retina Engrave as long as Retina Engrave is already open. If not, open it and then switch back to QCAD.
In QCAD, select print preview and then arrange the part on the page. Note that the blue borders are basically irrelevant, and you want to use the outer lines of the shaded page. Also make sure that you keep your scale correct at the top. From there you can hit print, and choose the “Full Spectrum Engineering Driver” as the target printer.
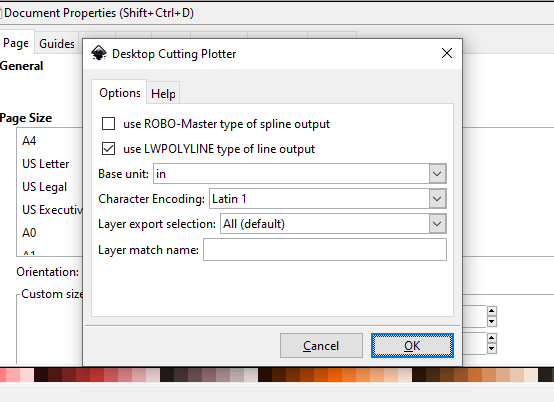
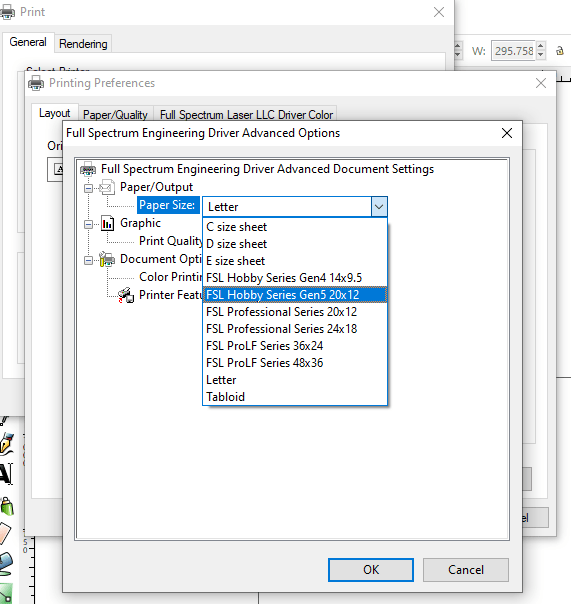
There are a few printer driver settings that should be correct by default, but I have attached them here as well. The page size or color method do not seem to have an effect on the result.
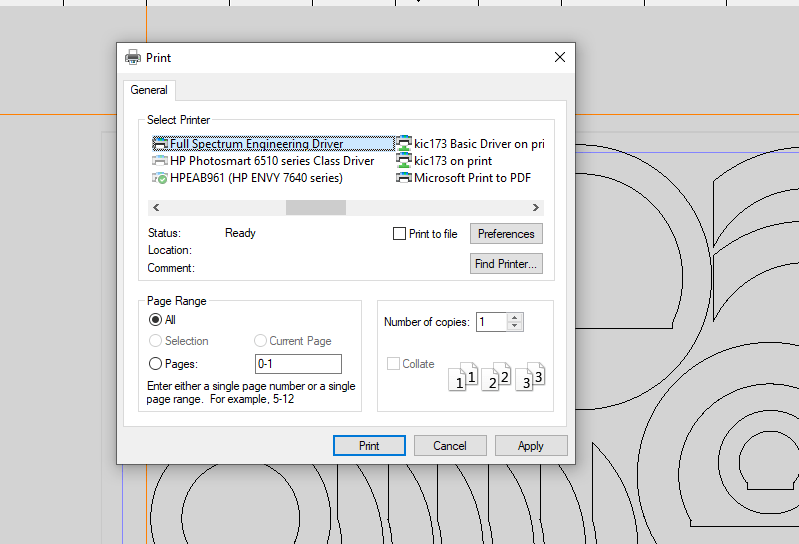
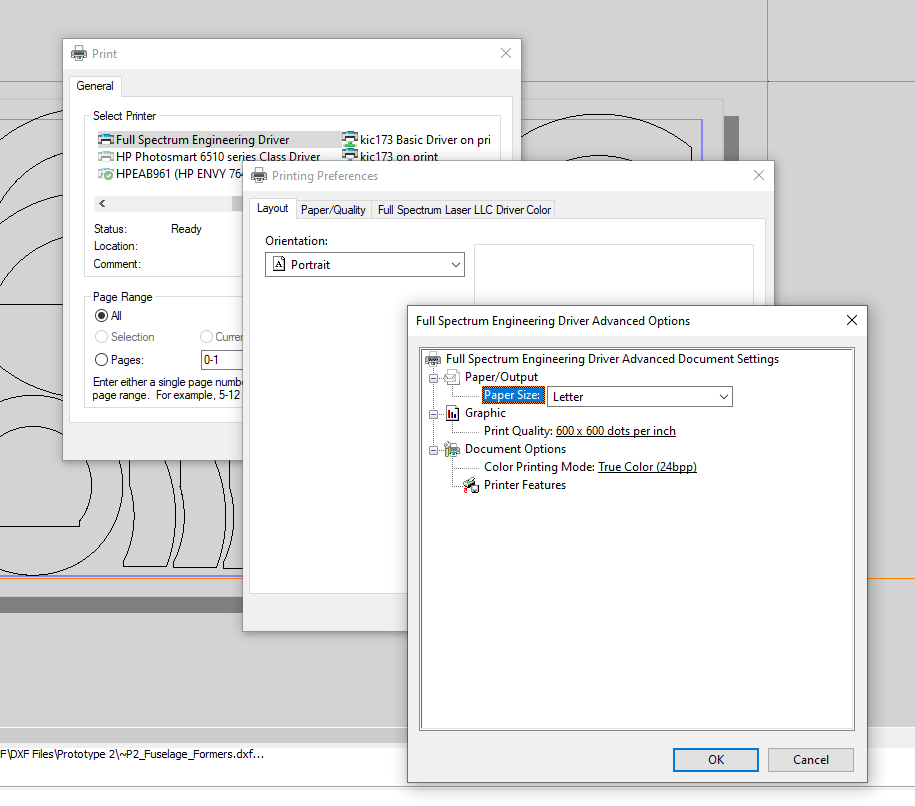

To export, print it (ctrl-p) to the “Full Spectrum Engineering Driver”. The print driver settings (at least for me) reset to defaults every time, so to avoid scaling issues select the correct paper size in the print driver settings.
Print, and you should see Retina Engrave begin to load the part, assuming it is open. If not, open Retina Engrave and print again.
Now you can switch to Retina Engrave to cut your file out.
Inkscape – file editing and exporting
If QCAD is having issues exporting the file, (e.g. lines do not show up in Retina Engrave), you can also try Inkscape! This can often be a faster and more reliable export process if you have less node editing work to do or are already familiar with Inkscape.
First, open the dxf file in Inkscape. It will give you an import menu that looks like this
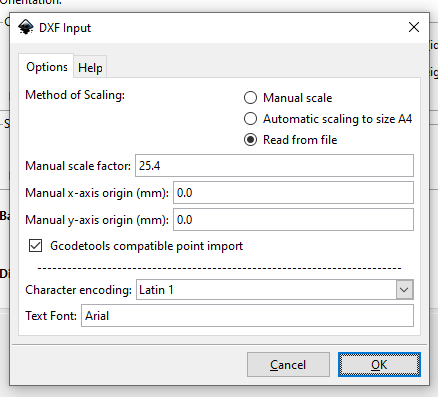
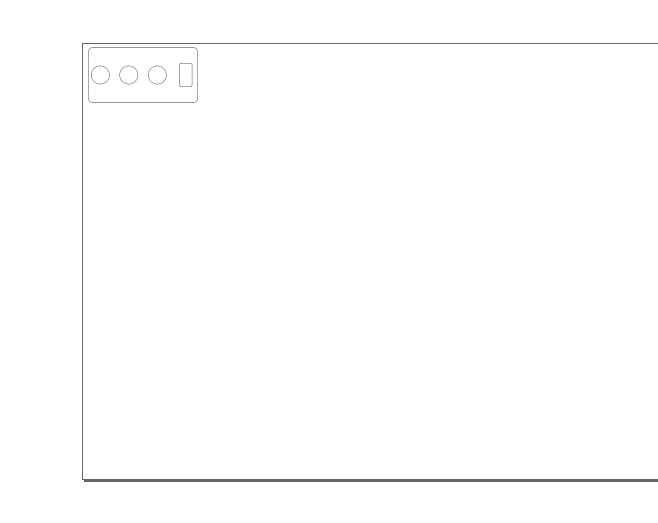
These are the settings I use, feel free to play around with them. The next thing to do is to resize your canvas. This is not strictly necessary if you are cutting a part smaller than the default page size, but it will help line things up. This laser cutter has a bed size of 20×12 inches, so change the page accordingly.

Now you can orient your part on the canvas and delete extra artifacts.

To export, print it (ctrl-p) to the “Full Spectrum Engineering Driver”. The print driver settings (at least for me) reset to defaults every time, but thankfully the default ones seem to work.
You should see Retina Engrave begin to load the part, assuming it is open. If not, open Retina Engrave and print again.
Retina Engrave – cutting out the part
Yay! We can finally cut the part out!
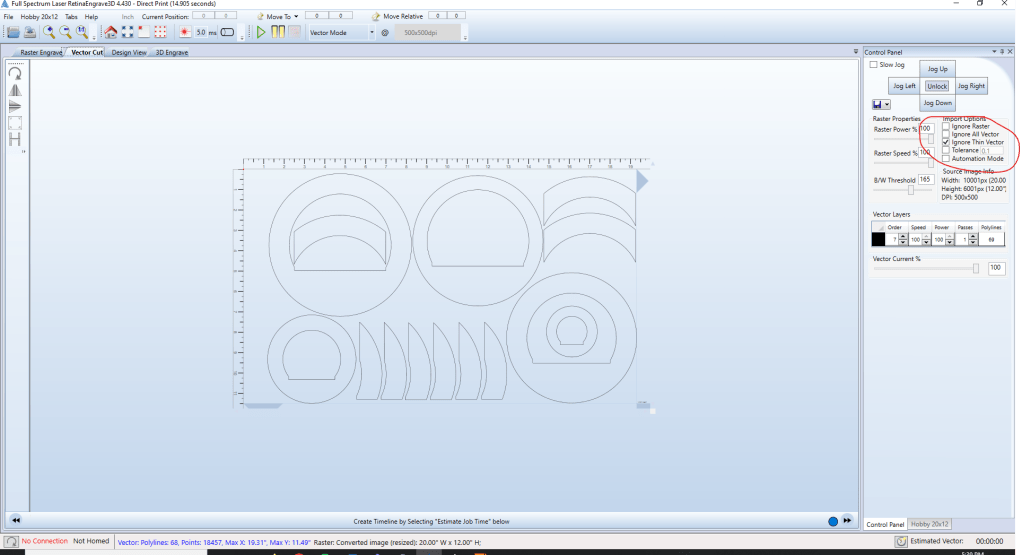
In Retina Engrave, you should see your part. Make sure the tab is switched to “Vector Cut” if you’re cutting out a part. If you’re burning an image, set it to “Raster Engrave”.
Make sure that “ignore thin vector” is selected otherwise you might get a border around the edge of the page that the machine will try to cut out. If it does show up, you can right-click and disable the “polyline”. This will tell the software not to cut this line.
Set the power and speed settings according to the material. Please try to run the laser on lower power so that the fume hood is not overwhelmed (and so the material doesn’t catch on fire). Remember that slower burns things more. Less speed is more fire. Don’t make that mistake. Please. Generally, run 100% speed and change the power and passes as needed. Here are a few guidelines:
Foamboard:
full cut [100% speed 45% power 1 pass]
score [100% speed 15% power 1 pass]
mark [100% speed 5% power 1 pass]
1/8″ Plywood
full cut [100% speed 60% power 4 passes]
Here is the start process for turning the entire system on. Please make this into a checklist every time you boot up the machine, it can be finicky.
STARTUP CHECKLIST
- Plug in the air compressor. Note that this will overheat after a while, so make sure you keep track of it.
- Turn on the water chiller. The alarm will sound temporarily as the pump begins to flow.
- Turn on BOTH filters by pressing the red button in the center of the boxes. The left one should read 5.050 and the right should read 5.100. Ideally these are both at 5.100, but the filters are old and we can’t seem to get new ones. If they beep, press the button on the right to silence the alarm. Lowering the flow rate will help if they beep too often, but then it won’t clean the fumes as well.
- Turn on the laser. There is a red flip switch in the back and an emergency switch on the top. More about the emergency switch later.
- Plug in the Ethernet cable to your laptop. Make sure the green and yellow blinky lights are on for the adapter, otherwise the display will show 0.0.0.0 as the address, meaning it couldn’t find the laptop. If you have numbers like 198.12.3.2131 or something, you’re fine. It does take a while to load.
Refresh the connection to the laser in retina engrave, it should show the ip address in green.
Now, we can cut the part.
We take a break from our regularly scheduled programming to interrupt you with this VERY important message.
PLEASE SMACK THE EMERGENCY STOP BUTTON IF ANYTHING STARTS TO GO WRONG.
You can stop the print in the software if you realize it’s too slow, or it’s going to be offset, etc. But this takes time. RKO’ing the emergency stop does not. If you see fire, you can’t afford to wait until the software feels like slowing down.
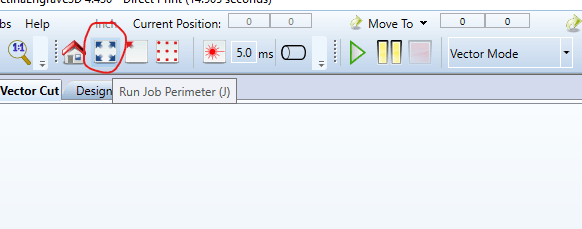
Place your material onto the bed and close the lid. You can adjust the origin part of the laser as long as the part is smaller than the bed. The laser will always start in the top left corner of the material. Use the “Run Job Perimeter (J)” command to watch how far across the material the laser will move over this specific part.
Make sure that the laser head is about a quarter-inch off the material. It is unclear what the best focal distance is, but this seems to work well.
Once you’re happy with this, run the print.
If it didn’t cut all the way through and you didn’t move the part, you can run it again to cut deeper into the material.
Good Luck.